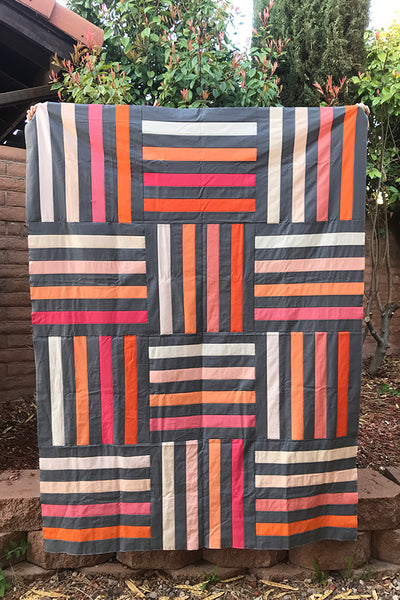
Pre cuts are some of the most convenient, time-saving fabric options available! Most of the cutting and even picking fabric is done for you. We also love that you can get an entire collection affordably with one of these fun sets.
This week, we are going to work with 2 jelly roll packs to put together a modern quilt top that is quick and easy and can be completed in only a few hours.
What is a Jelly Roll?
A jelly roll can be called by different names, but ultimately what we are looking for is a roll of strips 2 1/2″ x the width of the fabric. You can get skinny jelly rolls as well, so make sure that you check the width on the pack that you choose. Often when you buy a jelly roll, you’ll get every fabric in a collection. Sometimes you’ll get a couple strips of each print or color in one jelly roll.

Is this a Beginner Friendly Quilt?
Absolutely! Using precuts is a quick and easy way to try quilting. With minimal cutting, there’s little room to make mistakes and this quilt can be finished by brand new quilters or experienced ones alike. If you are new, remember that you are using a 1/4″ seam for all of the blocks and take your time. The biggest thing you want to watch for is that you aren’t pulling and stretching your fabric as you are sewing them together. Also, make sure you are pressing your seams instead of ironing them. Ironing can distort the block, but simply picking up and setting down the iron as you press along the seam will keep things straight and square.
Quilt Supply List
This pattern makes a finished quilt of approximately 54×72″.
This is likely the easiest supply list we will ever have. You need 2 jelly rolls. That’s it!
For the main fabric (can be prints or solids, I’m using solids in my version but call them prints. Just know anytime I say print, I mean the main fabric) you’ll need a jelly roll that has at least 24 strips in it. This jelly roll can be anything you like. Find a collection you love and grab it!
For the background fabric you’ll need a jelly roll that has 40 strips in it. This will leave enough for binding as well. For this quilt, we recommend your background jelly roll to either be all one fabric or fabrics that have very little contrast. The focus here is on the main fabric and we don’t want to compete or take away from that. You can often find black, white, or gray jelly rolls that are all one solid fabric and those work well for this quilt design. A tone on tone fabric would look great too.
Making the Strips
The first step is to sort out your jelly rolls. We are going to make 6 different sets. In each set you will need 4 of your main fabric and 5 of your background fabric.
Starting with the background fabric, sew the 9 strips in each set together alternating background/main/background, etc. You’ll start and finish your set with a background strip.
Sew along the entire length of the strip. I recommend lining up one side and letting the opposite one be all different lengths. Even with fabrics made by the same manufacturer, some will end up longer than others.
Press your strips after you sew them together. If you have a darker background fabric, press all of your seams to the background. If you are using white, you can press all of your seams to the main fabric.
Repeat with the remaining 5 sets of fabrics strips.

Cutting the Blocks
After you have all of your strips sets sewn together, we are ready to cut the quilt blocks. You will be cutting two 18 1/2″ square blocks out of each of the strip sets. Start by folding one strip set in half, making sure it’s lined up along the top and bottom edge. Cut off the selvedges and then cut your two blocks. Repeat until you have 12 blocks total.
Laying out the Quilt
We are going to alternate the blocks in the final layout. Start with one block going horizontal, then the second quilt block will be vertical, finishing with a horizontal block.
The second row will be opposite, vertical/horizontal/vertical. Repeat these two rows for 4 rows total.
Sew the blocks together in rows first, then sew the rows together. When ironing the seams, we ironed ours towards the background fabric. Since there aren’t any seams on that side, it will help you quilt top to lay flatter and make it nice and easy to nest seams when lining up your blocks.
After the quilt top is sewn together, run a quick line of stitches about 1/8″ from the edge. Since there aren’t any borders on this quilt, that will help keep everything together until you get it quilted!
With that, your top is done and you are ready to finish it. If you want to make a different size, you could do 6 blocks each and make two easy jelly roll baby quilts, or simple grab more jelly rolls and make additional blocks to go as big as you would like.

If you make this quilt and post photos on social media, don’t forget to tag us @onwilliamsstreet so we can see it! We love seeing what you create with our tutorials. Also, feel free to share with a friend. This pattern would make a fun guild charity project or easy quilt to complete on a quilting retreat or weekend sew along.
Happy Quilting!
Kimie and Missy


